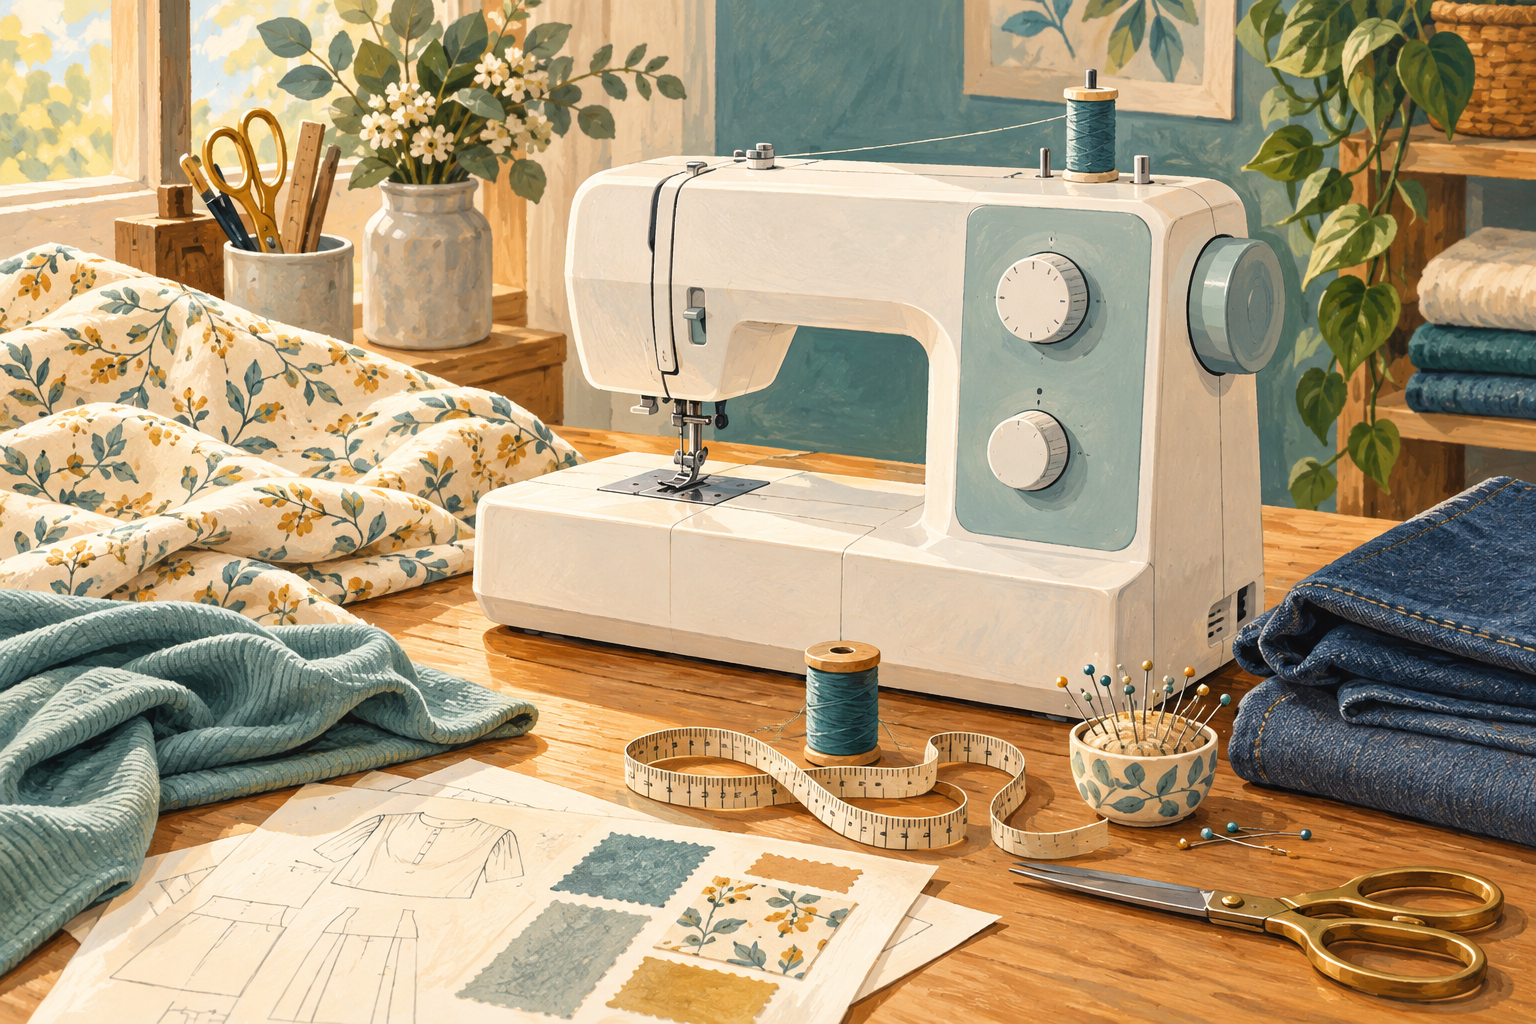
Learning how to choose a sewing machine is easier when you start with three projects you actually want to finish. Shortening trousers and repairing school uniforms call for a different setup from stretch dresses, quilted bags or large bed quilts. Name the work first, then decide which controls, stitches and workspace deserve your money.
The best first purchase is usually a general-purpose domestic sewing machine with dependable straight and zigzag stitches, adjustable stitch length, usable speed control and a buttonhole system you understand. After that, the priorities depend on your fabric, available space, budget and appetite for learning. A longer stitch list cannot compensate for a machine that is awkward to thread or uncomfortable to use at your table. For repairs and mixed projects, our home-sewing shortlist compares machines built around that everyday brief. If clothing is the main goal, the garment-making comparison puts buttonholes and construction controls at the centre of the decision.
This sewing-machine buying guide explains the choices behind those priorities. It includes ways to test a machine, budget for the accessories you will actually use and distinguish a worthwhile convenience from a feature that belongs on somebody else’s shopping list. The examples are buying scenarios, not claims that every machine has been tested in a workshop.
Table of Contents
How to choose a sewing machine from the projects you actually make
Write down three projects before you look at a product listing. Name the material and the awkward part of each job. “Sewing clothes” is a broad ambition; “hemming cotton trousers, making a stretch jersey top and sewing buttonholes in a linen shirt” gives you a useful buying brief. Each project asks something different of the feed system, needle, stitch and controls.
For the trousers, you need a machine that handles the folded hem and its thick side-seam intersection. The jersey top asks for a seam that tolerates movement and feeding that does not stretch the fabric out of shape. The linen shirt makes buttonhole consistency and accurate edge stitching important. That small list is already more informative than a claim that a machine has hundreds of stitch applications.
Separate your current work from a future hobby. It is reasonable to allow room to grow, but avoid buying an embroidery system because you might enjoy embroidery one day while compromising on the garment features you need this month. The first machine should make your likely projects manageable. A specialist can follow when the work justifies it.
Also record how often you expect to sew. A machine brought out for occasional repairs needs a clear manual, straightforward setup and sensible storage. A machine used most evenings needs comfortable controls, good visibility and a support route when something wears or stops working. Neither buyer benefits from paying for features they cannot identify a use for.
Make a short non-negotiable list. For example: adjustable length and width, a free arm, a one-step buttonhole and controllable slow sewing. Keep a separate wish list for automatic thread cutting, decorative patterns or an extension table. When the budget becomes tight, the distinction lets you remove conveniences without accidentally losing a requirement.
If your machine will spend weeks in storage between repairs, compare sewing machines for occasional use with setup and retrieval in mind. A clear threading routine, suitable storage and the controls needed for your actual repairs deserve more weight than features you rarely use.
Which sewing-machine type should you choose first?
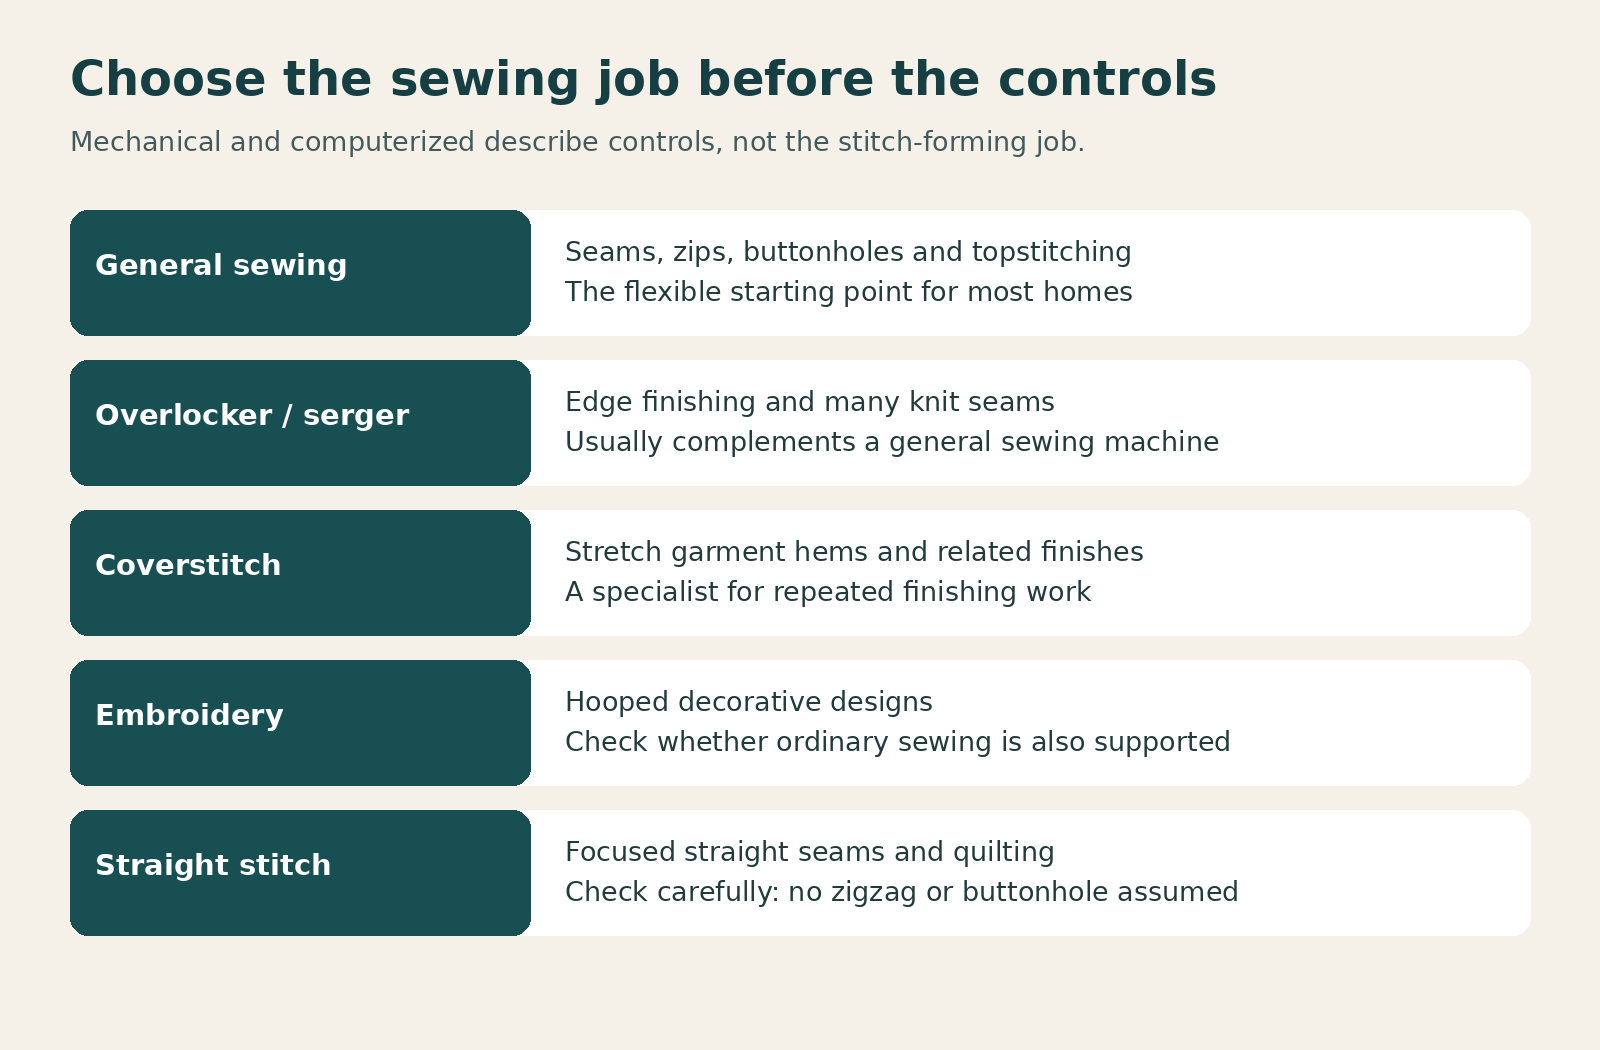
Machine names mix two different ideas: how you select settings and what work the machine performs. Mechanical and computerized describe the controls. General sewing, overlocking, coverstitch and embroidery describe the job. A computerized machine can be a general-purpose sewing machine or a specialist embroidery machine, so the electronic display alone tells you little about its suitability.
A general domestic sewing machine is the normal starting point for clothing construction, repairs, household projects and many crafts. It forms seams and topstitching, can usually make zigzag stitches and may offer a buttonhole system. Check the exact model rather than assuming every machine in the same brand or price bracket has the same operations.
A serger, also called an overlocker, forms a different seam and edge finish. Many models trim the edge while stitching, which makes them useful for clean seam finishing and knit construction. They are a valuable second machine for some sewists, but they do not normally replace the general machine for tasks such as inserting a zip or making a conventional buttonhole.
A coverstitch machine is aimed at hems and related finishes, especially on stretchy garments. The familiar parallel rows on the outside of many ready-to-wear T-shirt hems are a useful reference for its role. A domestic machine with a suitable twin-needle setup can cover some needs, but that does not make the two systems identical. Buy the dedicated machine when its finish and workflow solve a repeated problem.
An embroidery machine moves fabric in a hoop to stitch designs. Some machines combine sewing and embroidery, while others are embroidery-only. Before paying for a combination, check the sewing controls as carefully as the embroidery area. You still need a comfortable construction machine if you make the item being embroidered.
A straight-stitch specialist deserves its own category. It may offer a larger bed, strong straight-stitch performance or production conveniences, but it cannot be assumed to make zigzag seams or buttonholes. That can be an excellent deliberate choice for quilting or long straight seams and a frustrating accidental choice for a beginner expecting one machine to do everything.
Our guide to types of sewing machines separates these categories in more detail. Use it to decide which system you need before comparing model specifications. Comparing a serger with a domestic zigzag machine as if one were simply a more advanced version of the other will send the shortlist in the wrong direction.
Should you choose a mechanical or computerized sewing machine?
Mechanical machines generally use dials, levers and direct switches to select stitches and settings. They can feel approachable because the current position of a dial is visible. Someone who dislikes navigating menus may prefer that arrangement. A clear interface makes it easier to return to the machine after a few months away.
Computerized machines typically use buttons or a screen to select patterns and adjust settings. They may provide a speed limiter, needle up/down, stitch locking or saved settings, although the exact combination varies. Those conveniences can remove repeated actions during garment construction or patchwork. The benefit is the action saved, rather than the presence of a screen itself.
Neither control style guarantees good fabric feeding or easy repairs. A well-chosen mechanical machine can sew demanding projects within its intended scope, and a computerized machine can be an approachable first machine. Avoid treating mechanical as automatically durable or electronic as automatically complicated. Evaluate the actual controls and the service arrangements for the exact model.
Think about how you learn. If you enjoy changing a dial and watching the result, a mechanical interface may suit you. If a displayed stitch number and suggested settings help you stay oriented, computerized selection may feel clearer. Try selecting a straight stitch, changing its length and then returning to your starting setting without help. That small exercise reveals more than an advertising photograph.
Ask what happens when you turn the machine off. Does it remember the setting or return to a default? Does needle position change when you select another stitch? These details matter when restarting a seam. A feature is useful only when you understand how it behaves, so include a few minutes of control practice in any shop demonstration.
Which sewing-machine stitches are essential for everyday work?
Start with a straight stitch that has a useful length range. Shorter stitches can help with some curves or detailed work, while longer stitches have other uses such as basting. The correct choice depends on the material, thread and seam purpose. What matters at purchase is being able to adjust and repeat the setting without difficulty.
Zigzag adds edge finishing, stretch-friendly applications and other useful operations. Adjustable width and length allow you to change its behaviour. Check whether the machine permits those adjustments across the stitches you intend to use; a headline maximum width does not mean every pattern has the same adjustment range.
A buttonhole system becomes important when you make shirts, skirts or dresses. One-step systems can simplify repeating a sequence, but the result still depends on the fabric, stabilizer, foot and setup. A four-step system can be usable too. Test a complete buttonhole on a sample and inspect the spacing and finished length before deciding which process you prefer.
Stretch stitches may help when you sew knits, although a stitch name does not guarantee a suitable seam in every knit. Test both the appearance and the movement the seam needs to tolerate. If the project stretches in use, a seam that looks tidy while flat can still fail when worn. Needle and thread selection remain part of the result.
Decorative stitches are worthwhile when you can name where they will appear: borders, visible mending or embellishment, for example. Otherwise they are secondary. Read the actual stitch chart and distinguish selectable patterns from letters, embroidery designs and “applications.” These numbers are not interchangeable. The sewing-machine stitch-count guide explains how to compare the advertised totals without letting them dominate the decision.
How do sewing-machine feeding and presser-foot pressure affect your choice?
Fabric has to advance consistently beneath the needle for a seam to stay controlled. On a conventional domestic machine, the feed dogs and presser foot cooperate to move and hold the work during the stitch cycle. Uneven feeding can create shifting layers, stretched edges or inconsistent seam appearance, even when the machine has plenty of stitch options.
Adjustable presser-foot pressure changes how firmly the foot bears on the fabric. This is different from thread tension. Pressure adjustment can be useful when moving between fabric types, particularly when a setup feeds one fabric well but distorts another. Follow the machine’s instructions and test changes on scraps; more pressure is not always the answer.
Do not assume that a machine includes pressure adjustment because it has a computerized interface or a heavy-duty label. Manufacturers list it separately, and models with otherwise useful garment features may omit it. If light knits, slippery layers or varied fabrics dominate your projects, make this a specific item on the comparison sheet rather than a question asked after purchase.
A walking foot or even-feed attachment can help manage some layered projects, depending on the machine and attachment. An integrated upper-feed system works differently and should be assessed on its own merits. Neither term establishes universal compatibility. Check the exact machine, shank arrangement, supported foot and intended operation before buying an accessory.
Bring paired samples to a demonstration: two layers that tend to shift and a stretch fabric that tends to wave. Mark their starting edges so you can see whether one layer finishes ahead of the other. Let the feed system do the work. Pulling the sample through can conceal the very behaviour you are trying to assess.
| Sewing priority | Feature to examine | Demonstration task |
|---|---|---|
| Clothing | Buttonhole process, needle position, pressure adjustment | Repeat a buttonhole and sew a curved seam |
| Quilting | Throat clearance, table support, feed options | Turn a rolled project beneath the arm |
| Repairs | Free arm, setup clarity, controlled speed | Hem a tube and cross its side seam |
| Knits | Suitable stitches, feeding, pressure adjustment | Check a seam for waves and movement |
| Bags | Clearance, feeding, intended material range | Sew a realistic bulky intersection |
How much sewing-machine motor power do you really need?
Electrical input, motor output, torque and maximum sewing speed describe different things. A wattage figure alone cannot tell you whether a machine will move smoothly over a bulky seam. Gearing, needle choice, feed design, control electronics and the intended material range all influence performance. Compare machines by the work they can demonstrate rather than ranking them by one number.
Heavy-duty domestic machines can be useful for denim, canvas and other heavier household projects within their limits. The label does not convert them into industrial leather or upholstery machines. Continuous heavy work, dense materials and thick intersections may call for a different class of equipment. Ask the seller about the exact use instead of relying on a category name.
Maximum stitches per minute describes potential pace, not the speed at which you must sew. A high maximum is of limited comfort if the machine starts abruptly and is difficult to control slowly. Try beginning a seam gently, stopping at a mark and restarting over an intersection. For many home projects, that control matters more than a fast demonstration across flat cotton.
Use the correct needle and thread when testing heavier samples. An unsuitable needle can deflect or damage fabric and make a capable machine appear weak. Equally, a large needle cannot create clearance, feeding capability or sustained performance the machine was not designed to provide. Keep the whole setup in view.
If you mainly sew ordinary woven garments, do not pay for motor claims at the expense of buttonhole quality and fabric handling. If you sew bags with dense intersections, insist on a representative sample. Our sewing-machine motor-power explanation develops that distinction so you can ask more precise questions during a demonstration.
How much sewing-machine throat space and table support should you buy?
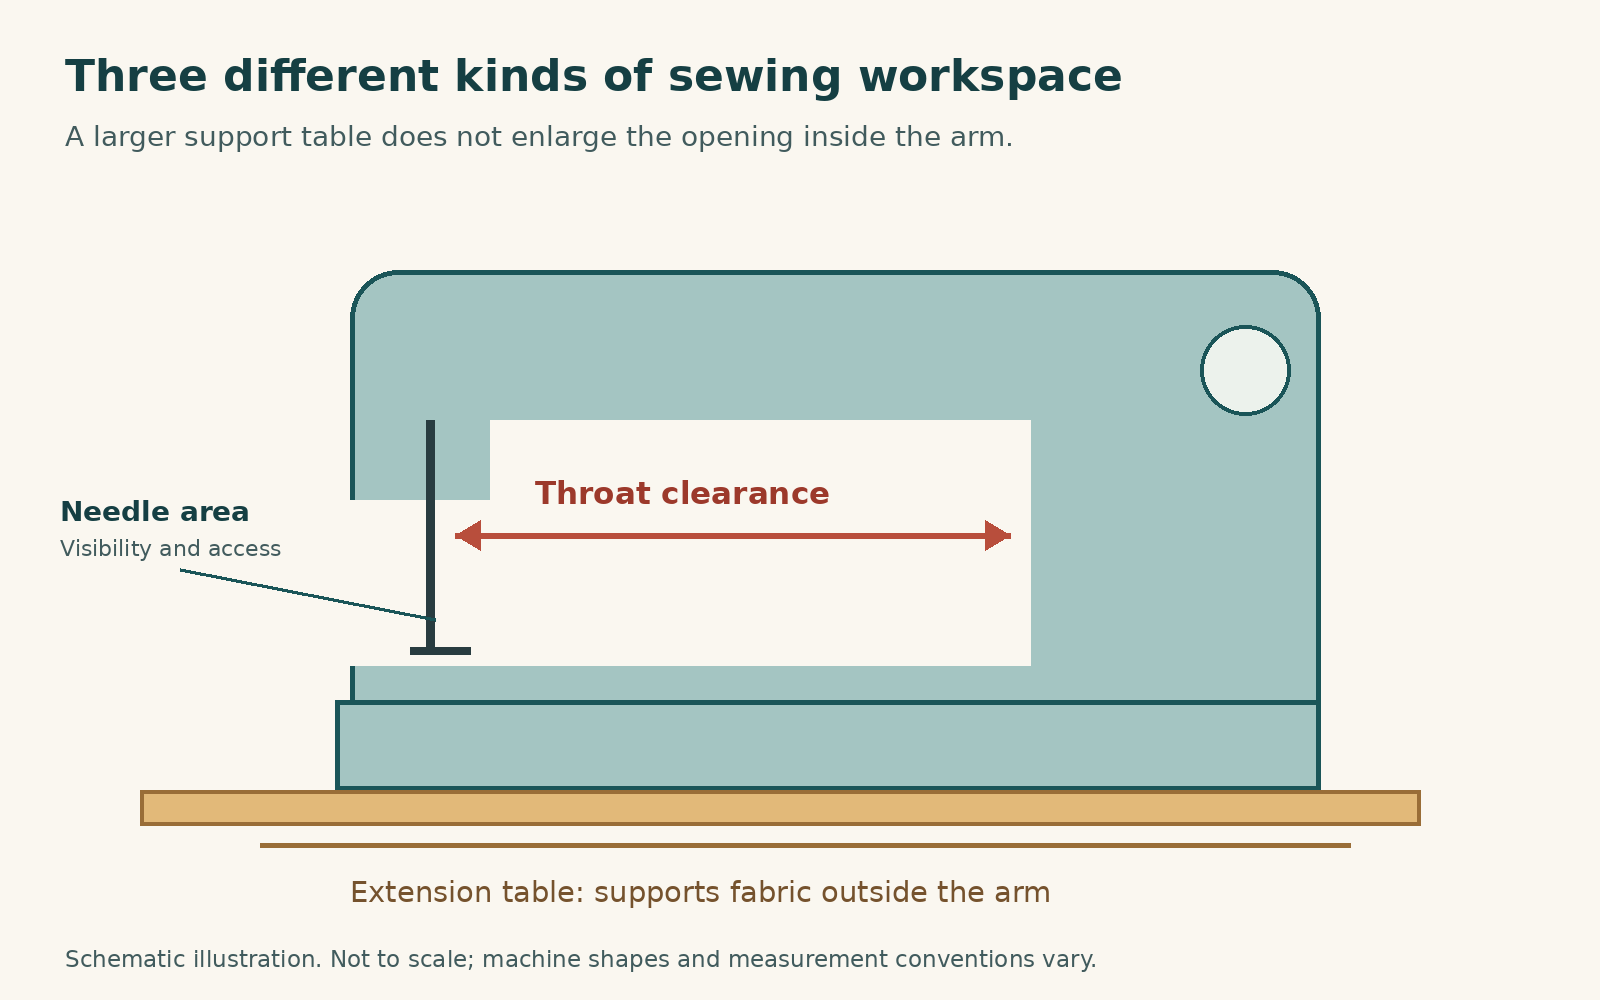
Throat space is the opening between the needle area and the machine body, often described by its horizontal clearance. It determines how much project bulk can pass through that space. A large quilt, curtain panel or bulky coat can become awkward when its weight and rolled fabric crowd the needle area.
An extension table supports fabric outside the machine. It can reduce the amount hanging over an edge, but it cannot enlarge the opening inside the arm. Treat the two as separate features. A machine with a small throat and a broad table still has a small throat, even though the table may improve support considerably.
For clothing, examine access around the needle as well as the published clearance. Can you see a collar edge, turn a curve and position a zip foot comfortably? For quilting, bring a folded or rolled sample that represents the bulk you expect to handle. A bare machine in a showroom hides the space taken by a real project.
A free arm is useful for some tubular pieces such as cuffs and trouser hems. Check how the accessory box comes off and whether the remaining arm fits the work you have in mind. Very small openings may still need another approach. A free arm is a convenience with physical dimensions, not a promise that every sleeve will slide over it.
Measure your own table before shopping. Leave room for the machine body, hands, fabric support, pedal lead and power cable. You also need a place to put tools without pushing them under the project. The throat-space buying guide helps connect these measurements to the way larger projects move through the machine.
Which sewing-machine controls make learning and regular sewing easier?
A speed limiter can cap the maximum pace, which helps when learning pedal control or sewing around small shapes. Check whether it works with the foot pedal, the start/stop button or both. Some controls that look similar behave differently, so test the mode you expect to use at home.
Needle up/down lets you stop with the needle in a chosen position on supported machines. Needle-down stopping can help when pivoting, while needle-up stopping helps remove work. You still need to understand how the machine completes the cycle. Do not pull fabric against a partly completed stitch simply because a button has been pressed.
Reverse controls deserve a practical test. A lever that must be held in an awkward position may become annoying during repeated seam starts. A locking-stitch function can be convenient, but check how it behaves for the selected stitch. Automatic actions should be predictable before they become part of a project routine.
Lighting affects visibility around the needle. Inspect it while fabric is under the foot, not only with the bed empty. Dark thread on dark fabric is a useful challenge. If you will need a task lamp, allow space and budget for it rather than assuming the built-in light will suit every room and pair of eyes.
Threading aids can remove friction, especially if small components are difficult to see or manipulate. Try the needle threader yourself with a supported needle and thread. Some combinations fall outside its working range. A feature described as automatic may still require a particular hand movement, needle position or preparation step.
How should you budget for a sewing machine and its first projects?
The purchase price is only part of the starting cost. You may need suitable needles, good thread, correct bobbins, fabric, cutting tools and a stable surface. A machine advertised with a large accessory bundle can still lack the one foot required for your project, while another machine may include it in a smaller but more useful set.
Think in budget bands rather than rigid promises about what a price always buys. Basic domestic machines usually concentrate on essential functions. Spending more may add convenience controls, a different feed system, better workspace or specialist capability. The relationship is not perfectly linear, and current offers vary. Ask which specific problem each price increase solves for you.
Use a total-cost calculation: machine plus essential accessories plus initial materials plus delivery or travel plus any immediate inspection or service. Keep an allowance for learning mistakes. It is frustrating to spend the whole budget on a machine and then practice with inappropriate thread or a needle that has already been damaged.
For an illustrative budget, suppose the machine costs 300, essential tools and consumables cost 65, first-project materials cost 40 and delivery costs 15 in your local currency. The starting total is 420. These are example inputs, not market prices. If you reserve another 30 for unexpected essentials, your planning figure becomes 450. Replace each input with your own quote.
Compare bundles by item rather than quantity. Ten unfamiliar feet are not automatically more useful than the zipper, buttonhole and overcasting feet your projects need. Check part numbers and availability for later purchases. A low initial price can lose its appeal if a proprietary replacement pedal, bobbin case or foot is difficult to obtain locally.
Sewing-machine starting budget calculator
Use one currency for every input. Total = machine + tools + materials + delivery + reserve. These defaults are an example, not quoted market prices.
Example total: 450.00 in your chosen currency.
Without JavaScript, add the five figures. A blank or negative amount must be corrected before using the total.
How do you compare new, used and refurbished sewing machines?
A new machine normally offers a clear starting condition and documented seller support, but read the actual return and warranty terms. Find out who pays shipping if a fault develops and whether a local shop will handle work for that retailer. A manufacturer’s brand name does not establish the seller’s obligations in your region.
A used machine can offer useful capability for less money, especially when a seller has kept its manual, accessories and service records. Inspect it as equipment, not as a bargain story. You need to see it thread, sew, change stitches and feed representative material. Cosmetic condition alone cannot reveal timing, feed or electrical problems.
A refurbished machine should come with a clear description of what was inspected or replaced. Ask who performed the work and what guarantee covers it. The word refurbished can describe different processes, so compare the written terms rather than assuming it matches a new machine’s coverage or an authorized factory service.
For any older machine, check the availability of a compatible pedal, power lead, bobbin case, feet and manuals before paying. The missing accessory may cost more than expected or be hard to find. Do not improvise an electrical connection or use a pedal merely because the plug seems to fit. Compatibility belongs in the purchase decision.
If a seller will not demonstrate the machine, price the risk honestly. A purchase that requires professional inspection or servicing needs room in the budget. Avoid turning a first sewing-machine purchase into an unknown repair project unless restoring machines is itself the hobby you want.
How should you test a sewing machine before buying it?
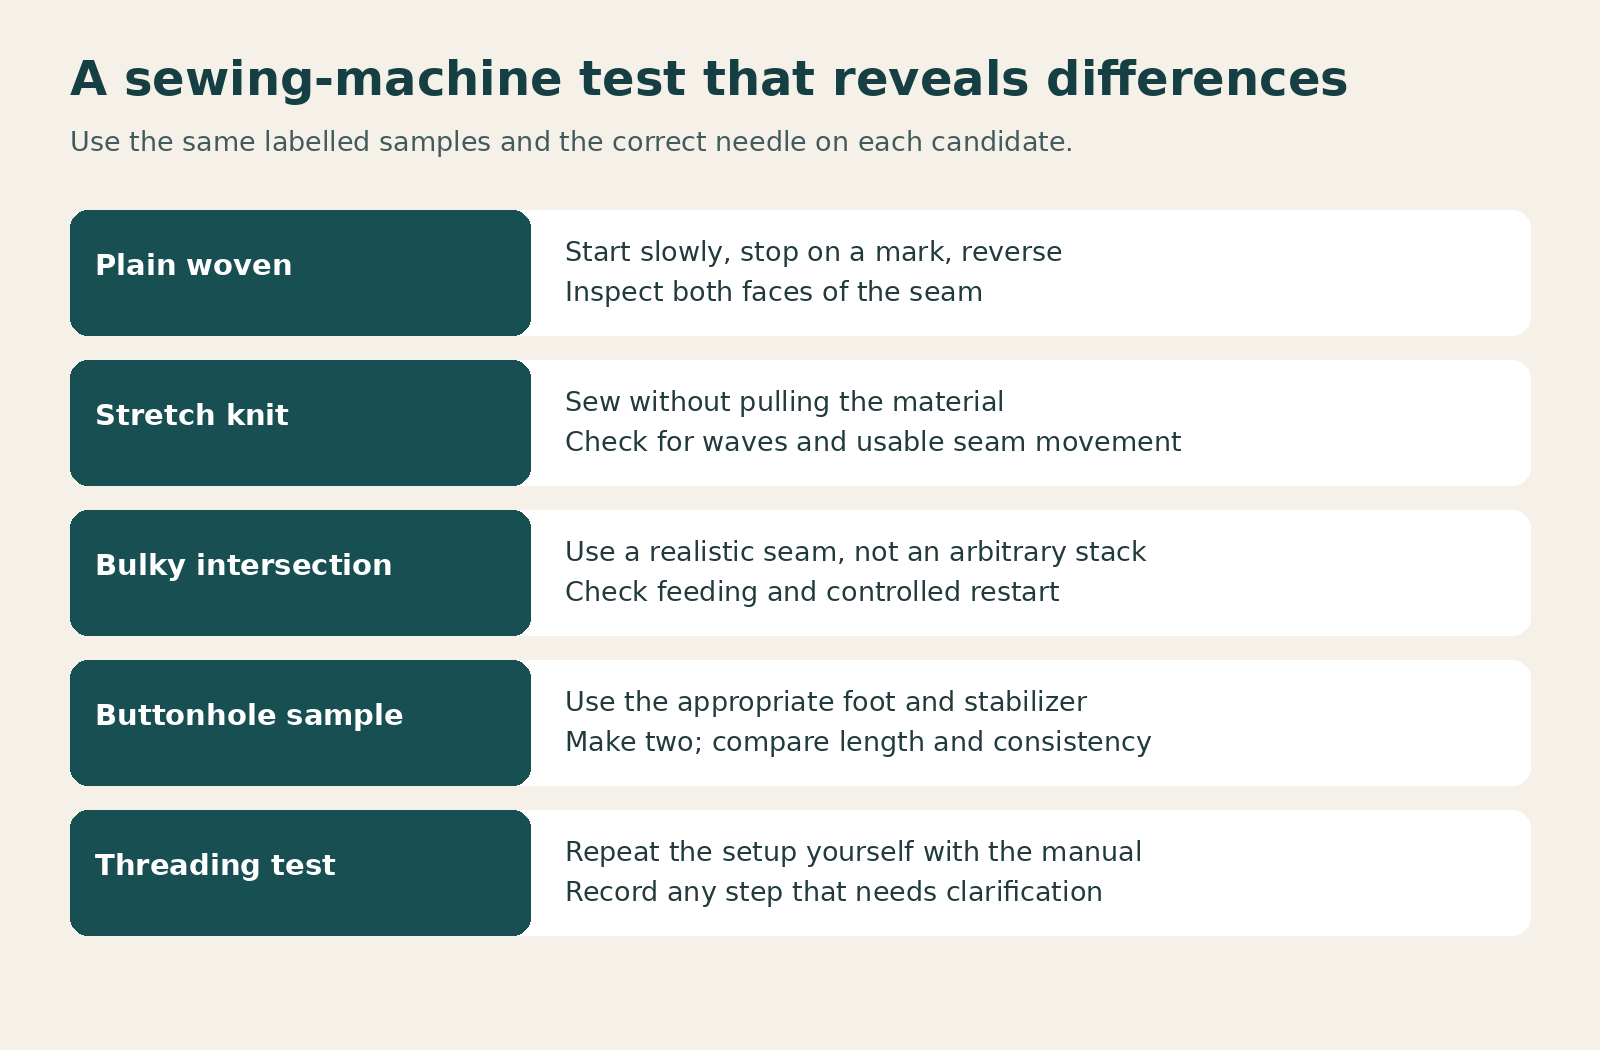
Bring a small testing kit: a plain woven cotton, a knit if you sew stretch garments, a sample with the thickest realistic seam intersection and the thread you intend to use. Ask permission before using your samples. The purpose is to reveal differences under comparable conditions, so label the samples and keep the same seam task for each machine.
Begin with threading. Have the demonstrator show the correct route, then repeat it yourself with the manual available. Check bobbin insertion and removal. A machine that sews well after an expert sets it up may still be awkward for you to operate alone. That does not make it a bad machine, but it changes the learning commitment.
Sew a straight line at a controlled pace, stop at a marked point and reverse where appropriate. Inspect both sides of the seam. Look for balanced formation, regular feeding and damage to the material. If something is wrong, allow the demonstrator to correct the setup and explain the cause instead of immediately blaming the machine.
Next sew a curve and a corner. These expose visibility, slow-speed control and pivoting comfort. Try the needle position and foot you would use for an edge seam or zip. For garment sewing, make a complete buttonhole on a stabilized sample and repeat it. One successful buttonhole is less informative than a repeatable process.
Move to the knit or bulky sample only after basic operation is clear. Use the recommended needle and settings. Do not pull the fabric, force an unusually thick stack or ask the machine to exceed its intended scope. Watch for layer shifting and stretching. Write down what changed when the setup was adjusted so you can reproduce it later.
Finish by removing the bobbin area cover as instructed for normal cleaning, identifying the accessible lint points and asking which tasks belong to a technician. Follow the manual’s power-off precautions for needle-area tasks. A demonstration should help you operate and care for the machine safely, not encourage exploratory internal adjustment.
Download the printable sewing-machine buying worksheet (PDF, 3 KB) to record model details, sample results, costs and questions for the seller.
How can you score sewing-machine choices without trusting marketing labels?
Create a short weighted scorecard based on your project brief. For garment sewing, you might give fabric handling and buttonholes more weight than decorative stitches. For patchwork, accurate piecing, work support and easy repeated settings may matter more. The weights express your needs; they are not laboratory measurements or a universal ranking.
Use a consistent scale, such as one to five, and write a reason beside each score. “Four for controls because I could change length and needle position without help” is useful. “Five because it looks professional” is not. If a feature cannot be verified, leave it unscored and record the unanswered question instead of assigning a hopeful number.
Multiply each rating by its weight and add the results. If fabric handling has weight four and receives a rating of three, its contribution is twelve. Repeat for all criteria. Compare totals only when every candidate has been assessed against the same items and evidence. Otherwise the arithmetic can make an uneven comparison look precise.
Keep disqualifiers outside the score. A machine that cannot make the stitch required for your next project should not win because it scores well for appearance and storage. Likewise, an unavailable manual or incompatible electrical version can be a reason to stop, regardless of the total. A scorecard helps organize judgement; it cannot replace it.
What should you check about sewing-machine warranty and service?
Read coverage by component and time period. A long headline warranty may apply to selected mechanical parts while electrical components, labour, adjustments or attachments have different terms. Find out what is excluded, what proof of purchase is required and whether coverage applies to your seller, country and intended use.
Ask where the machine goes for service. Local access can save packing, shipping and downtime, but a nearby dealer may have conditions for machines bought elsewhere. Contact the service provider before purchase if support is central to your decision. A vague promise that “any shop can fix it” is not a service plan.
Check ordinary consumables separately from major repairs. Needles and bobbins should be available in the correct specification. Feet, plates and cases may be model-specific even within a familiar brand. Keep a record of exact model and part numbers so that an accessory purchase does not depend on visual similarity.
For a shared household or class machine, think about who will maintain it. A clear manual, accessible cleaning routine and consistent storage for accessories can matter as much as an advanced feature. Write down the normal setup and keep it with the machine so that the next user does not inherit unexplained settings.
Which sewing-machine buying mistakes are easiest to avoid?
The first is choosing by stitch count alone. A large pattern library can be enjoyable, but it does not establish better straight stitching, more clearance or pressure adjustment. Compare the features that affect your actual material and seams, then consider decorative options if money remains.
The second is treating a machine label as proof. Heavy duty, professional and quilting can describe different combinations of features. Read the specifications and manual, identify the intended work and test the difficult part of your project. A photograph of denim beneath a foot does not define a continuous production rating.
The third is overlooking ergonomics. If the table is too high, the pedal slides away or the needle area is difficult to see, sewing becomes tiring. Sit at the machine for a few minutes instead of watching a standing demonstration. Consider where your elbows, feet and project will rest at home.
The fourth is buying a similar-looking variant. A model suffix, regional edition or seller bundle can change accessories or features. Compare the full model designation, voltage requirements and contents of the actual listing. Do not transfer specifications from a nearby model because its case looks the same.
The fifth is buying everything at once. Begin with tools and feet tied to your first projects, then add equipment when a repeated need appears. That leaves budget for fabric, practice and a lesson if needed. Confidence gained from a machine you understand is more useful than a drawer full of unexplained attachments.
What should your first week with a new sewing machine look like?
Unpack with the manual beside you and check the supplied parts before discarding packaging. Locate the model number, keep the receipt and register the machine if the manufacturer asks you to. Read the safety and setup instructions for the exact version, particularly around the pedal, needle area and power connection.
Practice threading and bobbin insertion before starting a valued garment. Sew a sampler on inexpensive fabric and write the settings beside each seam. Include straight, zigzag, a reverse start and a buttonhole if relevant. The sampler gives you a reference for what normal operation looked like when the machine was new.
Start with a manageable project that uses only a few techniques. A simple woven item lets you learn seam control without adding slippery fabric or complex fitting at the same time. Keep the manual open and change one setting at a time when diagnosing a problem. Random adjustments make it difficult to know what helped.
Learn needle selection early. The SCHMETZ needle guide explains needle types and their intended materials; use it alongside your machine’s specified needle system. A fresh, appropriate needle and correct threading should be part of the setup before you conclude that the machine cannot sew a fabric.
Keep notes on questions to ask the seller or teacher. If the machine repeatedly jams, damages thread or struggles on ordinary material after correct setup, document the sample and settings and seek support promptly. Do not compensate by forcing the handwheel or making internal adjustments outside the manual’s user maintenance instructions.
FAQs about how to choose a sewing machine
What sewing machine should a complete beginner buy?
Choose a general-purpose domestic machine that covers your planned seams and feels understandable when you thread and operate it yourself. Straight stitch, zigzag, adjustable settings and a usable buttonhole are sensible starting requirements. A speed limiter may help, but you do not need a large stitch library to learn. Prioritize a clear manual and accessible support.
Is a computerized sewing machine too complicated for a beginner?
Not necessarily. Clear buttons, a visible stitch number and controllable speed can make learning easier. Some beginners prefer physical dials instead. Try the actual setup sequence and select a few stitches before deciding. The control arrangement should suit the person using it rather than an assumption about what beginners ought to prefer.
Can one domestic sewing machine sew clothes and quilts?
Many general-purpose machines can handle garment sewing and patchwork within their intended limits. Larger quilting projects make throat space and fabric support more important, while garments may place greater emphasis on buttonholes and handling light or stretchy materials. Compare those needs explicitly and test representative samples instead of assuming a quilting label covers every task.
Should I choose a sewing machine with the most stitches?
Only when those patterns are useful to your work. A smaller selection with good adjustment and accessible controls can be more useful than a large library that is difficult to navigate. Check what the advertised number counts, then identify the stitches needed for your first few projects. Decorative variety belongs after basic capability in the decision.
Do I need a serger when buying my first sewing machine?
Usually a general-purpose machine is the more flexible starting point. A serger can become valuable for seam finishing and knit construction, but it normally leaves other jobs to the sewing machine. Buy it when the finish or speed solves a real recurring need, and allow time to learn its threading and tension system.
How much should I spend on my first sewing machine?
Choose a total budget that includes the machine, essential consumables and your first materials. There is no single amount that suits every region or project. Compare verified local offers and ask what each step up buys. Protect the features you need, keep some money for practice and avoid paying for specialist capability before you have a use for it.
Is a used sewing machine a sensible first purchase?
It can be when the machine can be demonstrated, the accessories and manual are available and you understand the support situation. Allow for inspection or servicing if needed. A low price is less attractive when a missing pedal, bobbin case or electrical problem makes the machine expensive to use. Buy the condition and compatibility, not just the brand badge.
How do I know a sewing-machine listing is the correct version?
Match the full model number, regional electrical specification, included accessories and written features. Save the listing and invoice details. If the product heading, photograph and specifications disagree, ask the seller to resolve the difference before purchase. Similar cases and model names are not enough to establish that two listings describe the same machine.
Make your sewing-machine choice with a written shortlist
For a first sewing machine, buy a general-purpose domestic model with straight and zigzag stitches, an understandable buttonhole process and controls you can use comfortably. Spend extra on a feature when you can name the operation it will improve: speed control for careful starts, pressure adjustment for changing fabrics, or more workspace for bulky projects.
A machine that covers your next three projects and leaves room in the budget for the correct needles, thread and feet is a sound first purchase. Embroidery, overlocking and other specialist work can justify separate equipment later. You do not need to solve every possible sewing task with the first machine.